
Your demo project has arrived for you to test. Let's look at how to analyze the project using this demo address or files. Demo stages can be seen in a wide range of projects.
Demos follow a similar logic in all website, mobile application, game programming, desktop software, and embedded software projects. The first thing you should know is that practically all of the text and graphics are provided as examples (dummy data). Just before the broadcast phase, actual content is introduced. According to the contract you signed, actual content will be added by you or the person-agency you work with.
The majority of the time, you'll see Latin text like the one below. This article is frequently used as a sample article in journalism, printing, and software. It is a wonderful choice for demos because it includes various word, text line, and paragraph lengths.
Sit amet lorem ipsum dolor, consectetur adipiscing elite. Vestibulum ut facilisis, diam ullamcorper. Non auctor risus cursus ut volutpat libero est.
You should keep bugs and feature requests (revisions) distinct in your project at all levels. If the updates you provide are not covered under your contract, their viability will be assessed and an additional price will be assessed. The corporate representative you work with can separate them, but separating them yourself will speed up and clarify the procedure.
Write down your bug reports and feature requests item by item, using short headings. If these headings are unclear or appear confusing, provide explanations under them.
We shall disregard the specific demo kinds. The remaining basic stages can be classified as follows:
- The project's draft phase (Wireframe / Sketch / Prototype)
- Design (Visual Design) phase
- Phase of frontend (UI-UX) page dumps
- Backend software development phase
Draft Demo (Wireframe)
You begin with this stage if you have a large saas, game, or app project. Following the project analysis, a detailed business plan with text or diagrams is created for your project. At this step, simple lines are used to visually create how your project will be positioned in the design. In short, you decide what goes where at this point.
This is a demonstration, not a design. At this time, no colors or photos are available. Although there are colorings and sample images, they are optional and are included to provide a more concrete outline. The goal here is not to reveal the design, but to define the design's primary lines. Your expectations should revolve around usability, user experience, and access to features.
For example, if you have a contact button, you can specify that it should be at the top of the page rather than at the bottom. If communication with potential project users is more vital than other aspects, you might emphasize it in this step.
Despite its simple lines, this demo depicts a lengthy and exhausting procedure. Here, feature decisions are made concrete, updated, and explained. The first work is completed at this stage to facilitate the workflow in complex projects. You should be entirely clear on the positioning and user experience elements while reviewing this sample.
It will be beneficial to explicitly specify the locations here, as this may disturb the design concept, cause challenges, and lengthen the project process throughout the design phase.
Design Demo
The design concept for your project is created at this stage. Colors, shading, borders, spacing, and other design elements are altered in accordance with design principles. Small and medium-sized projects typically begin at this stage. For projects of this size, wireframe preparation will consume more time than it will benefit.
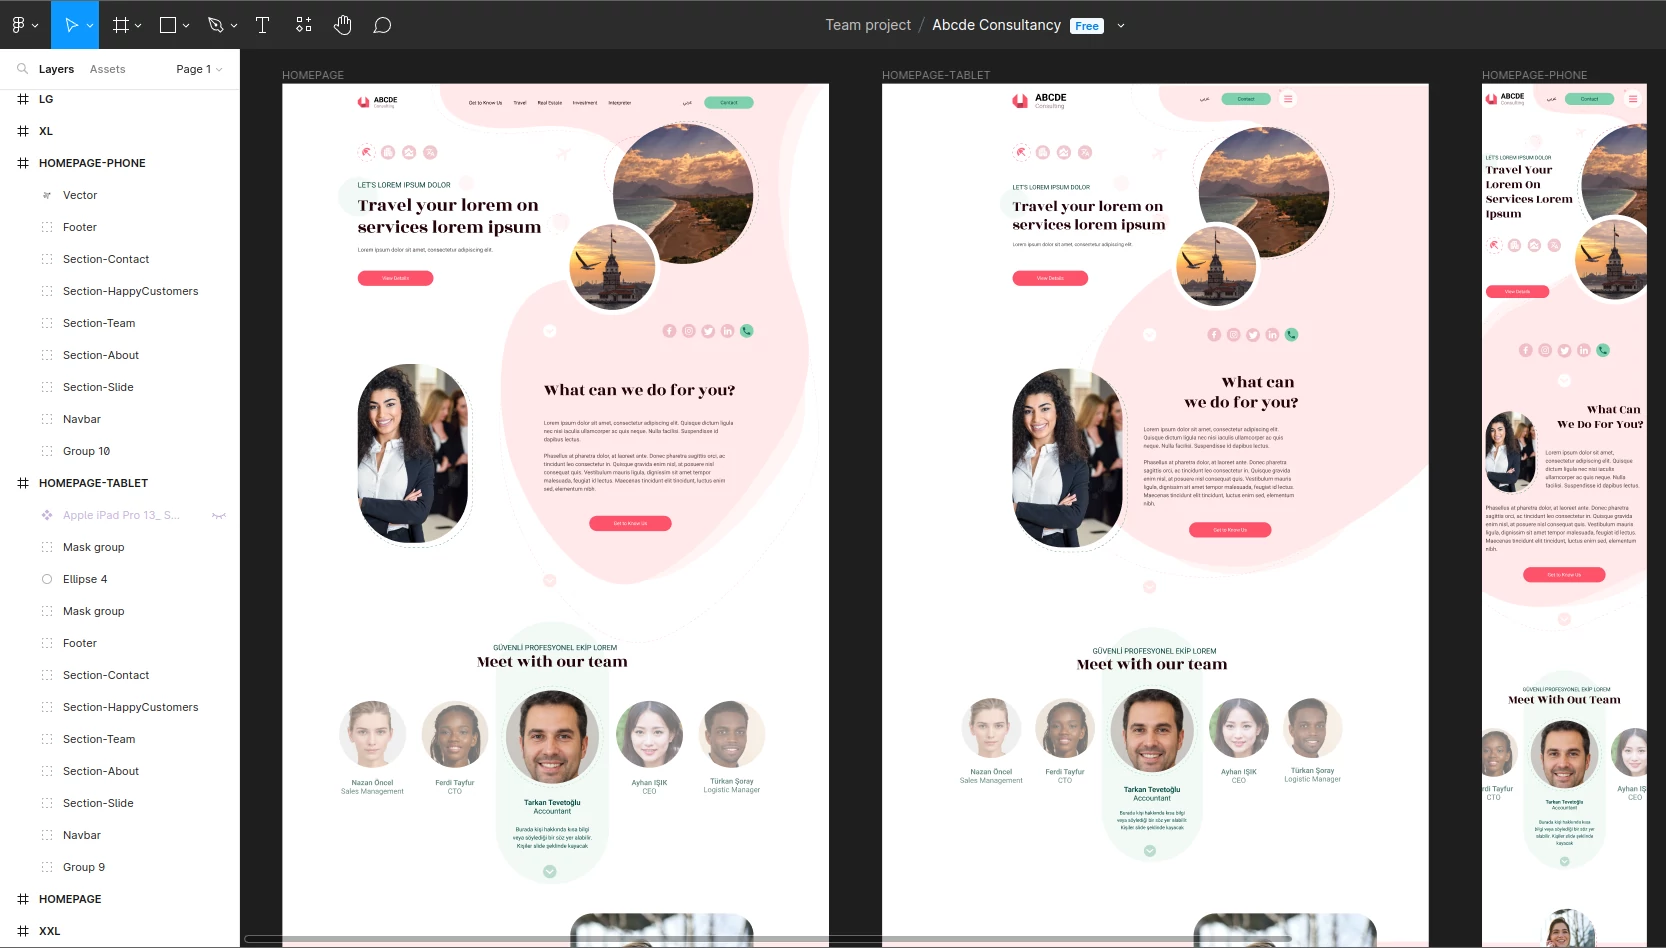
This style of demonstration is also non-interactive. It is created using design software such as Figma and Photoshop and supplied to you in jpg, png, and webp formats. There are no effects, user interaction, or form submissions.
You confirm the project's design concept and positioning here. This is exactly how it will look after the job is completed. You must be certain and confirm these concerns before moving to the Frontend-Backend stages.
Because the software process is the most abstract development area of the project, any additional revisions will lengthen the project process significantly. Software teams examine the existing design and work inside a framework of abstract connections. They begin by adding numerous dependencies and selecting various plugins in order to add specific functionalities. When a new task enters this plan that is not in the approved design and software specifications, they may have to totally remove these plugins and dependencies from the system. In truth, an add-on developed in a different scope may have been installed, but not to the point where it will meet the revision you require. It may meet the project's basic requirements but not the specific changes. The software developer took the correct decision in order to avoid hasty optimization and the creation of unwanted performance difficulties.
For all of these reasons, you must ensure that your design demo was created in compliance with your employment contract and approve it.
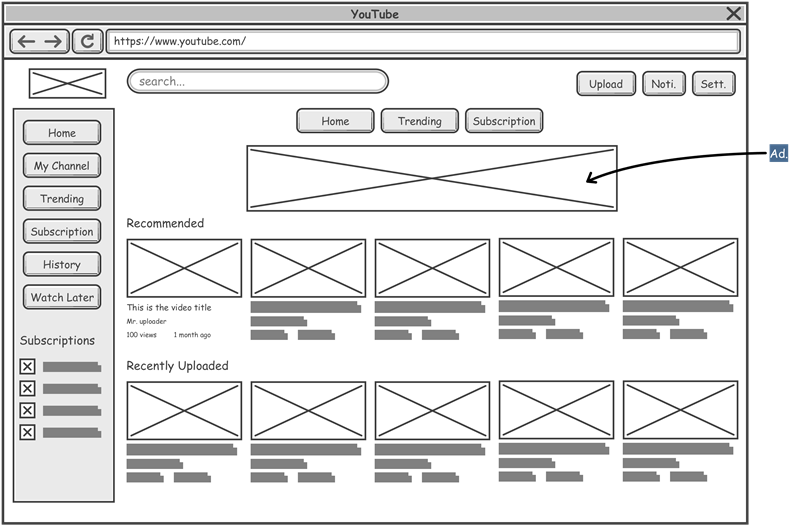
Front-End Demo (UI/UX)
Your project has now progressed to the point where you can test preliminary interactions on a browser, desktop, or mobile device. Here, you can interact with the project's properties by clicking or touching it.
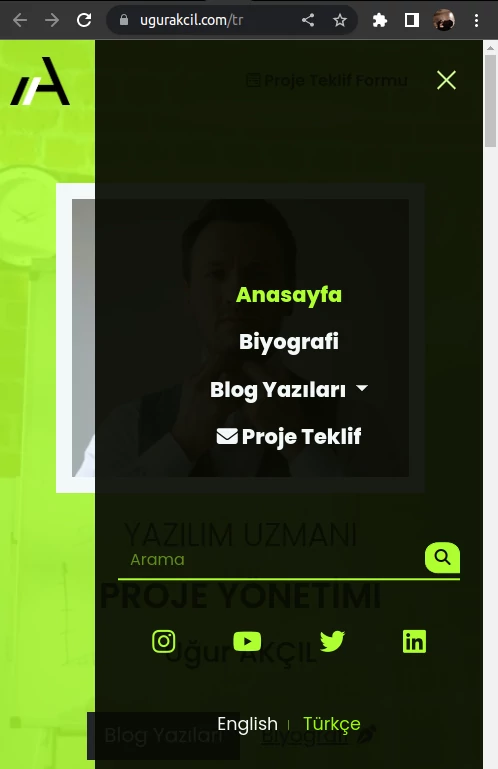
There will be no form fields, administration panel actions, dynamic data to be brought from the server, or anything else at this point. You will test your product in contexts where users may interact with it, such as a web browser.
Let's talk about the tests you'll need to perform at this point.
How it looks on different platforms or browsers
If your product is for the web, you should test it with browsers such as Chrome, Firefox, Edge, and Safari. If you encounter issues in various browsers, please notify the program developers.
If your project requires installation, you must individually test how it functions on the platforms specified in the contract. For example, you could want a project created for Windows to work well on a Mac.
How it looks on different screen sizes
It is critical to consider how your consumers will perceive your project in different screen sizes while it is running on the internet or in any environment that requires installation. Is there any page overflow? Is the scrollbar in an inappropriate location? Is there a function on a small screen that should be hidden? Are there any issues with the alignments? Are the fonts and spacing too big or too small?
Software Demo / Dynamic Demo (Backend)
Following the static content demos, you can view a project demo that can be managed and interacted with server services. You will be given access to a management panel at this point, where you may add and delete content, as well as review users and incoming forms.
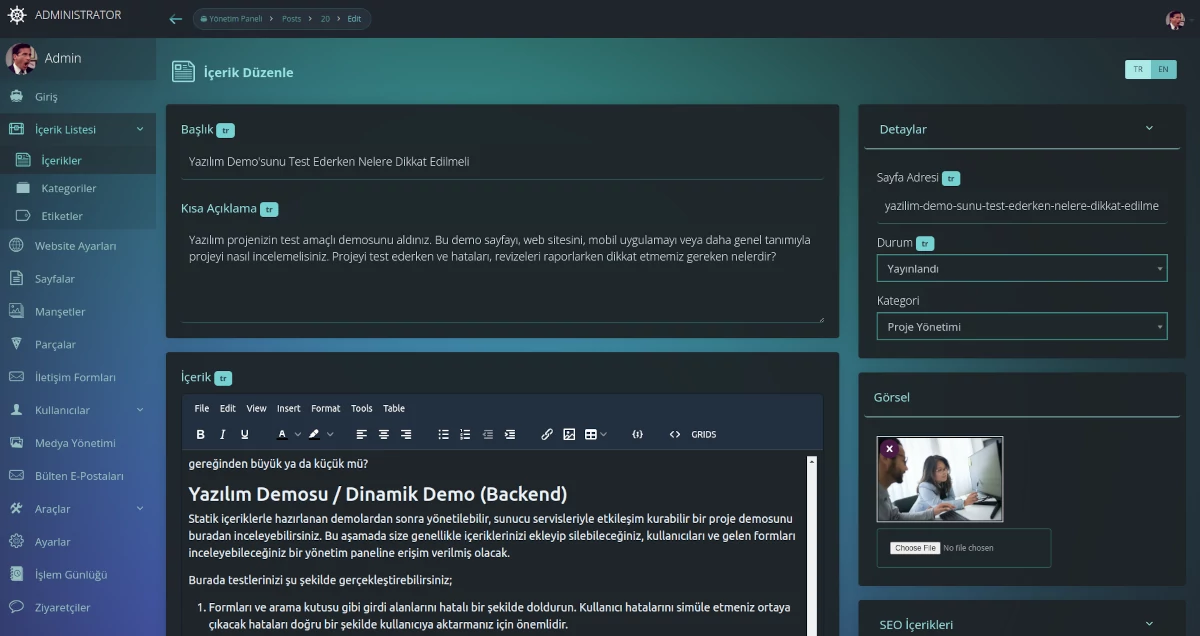
Here you can perform your tests as follows;
- Incorrectly fill out forms and input fields such as the search box. Simulating user faults is critical for accurately communicating problems to the user.
- Giving all areas of your administration panel to a single user can cause security problems or human errors. Examine limiting user roles.
- Include both long and short content. Examine the borders of the content regions on your site. Take note of these constraints. Report any content areas that should not be restricted to the developers.
- You don't need to test this section for user mistakes very often because you'll be using the administration panel here and will gain experience. It is critical that the entire system is not rendered inaccessible due to a minor content issue. As a result, make minor mistakes and insist that problems that arise on the front end of your project be prevented. It is natural for you to make mistakes in some content, which you may correct later while it is still online. It would be unusual in this case for your content error to prevent all users from accessing your project.
